


How to Earthquake-Proof Your Home in San Jose
How to Earthquake-Proof Your Home in San Jose San Jose, nestled in the heart of California’s Silicon Valley, is one of the most technologically advanced cities in the world. Yet beneath its sleek skyscrapers and innovation-driven neighborhoods lies a geological reality that demands serious attention: the city sits directly on the edge of the Hayward Fault and is within close proximity to the San A
How to Earthquake-Proof Your Home in San Jose
San Jose, nestled in the heart of Californias Silicon Valley, is one of the most technologically advanced cities in the world. Yet beneath its sleek skyscrapers and innovation-driven neighborhoods lies a geological reality that demands serious attention: the city sits directly on the edge of the Hayward Fault and is within close proximity to the San Andreas Fault. These active seismic zones make San Jose one of the most earthquake-prone metropolitan areas in the United States. According to the U.S. Geological Survey (USGS), there is a 72% chance of a magnitude 6.7 or greater earthquake striking the Bay Areaincluding San Josewithin the next 30 years. The 1989 Loma Prieta earthquake, which caused over $6 billion in damage and 63 fatalities, was a sobering reminder of the regions vulnerability. Today, with homes aging, infrastructure expanding, and climate patterns shifting, preparing your residence for seismic events is not just wiseits essential.
Earthquake-proofing your home in San Jose is not about achieving absolute invulnerability. Its about reducing risk, minimizing structural damage, protecting lives, and ensuring your property remains habitable and valuable after a major tremor. This guide provides a comprehensive, step-by-step roadmap tailored specifically to San Jose homeowners. Whether you live in a 1950s ranch-style house in Willow Glen or a modern condominium in Downtown San Jose, the principles outlined here will help you safeguard your investment and your familys safety. This is not a theoretical exercise. Its a practical, actionable plan grounded in engineering best practices, local building codes, and real-world experience.
Step-by-Step Guide
1. Assess Your Homes Structural Vulnerability
Before any retrofitting begins, you must understand your homes current seismic condition. Start by identifying the construction era of your property. Homes built before 1980especially those with a soft story (a weak first floor, often with large garage openings or open floor plans)are at significantly higher risk of collapse during earthquakes. In San Jose, many homes from the 1940s to 1970s were constructed with crawl spaces and unbraced cripple walls, which can buckle under lateral seismic forces.
Conduct a visual inspection of your foundation. Look for cracks wider than 1/8 inch, uneven floors, or doors and windows that no longer close properlythese are signs of foundation movement. Check for visible separation between the foundation and the wood framing above. If your home has a raised foundation with wooden posts or piers supporting the structure, it likely needs retrofitting.
For a professional assessment, consider hiring a licensed structural engineer or a certified seismic retrofit specialist. Many San Jose residents qualify for free or low-cost seismic evaluations through the City of San Joses Earthquake Safety Program. These assessments provide a detailed report on your homes vulnerabilities and recommend specific retrofit measures based on your homes design and location.
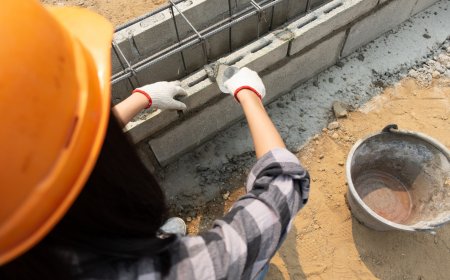
2. Strengthen the Foundation with a Retrofit
The most critical step in earthquake-proofing a home in San Jose is strengthening the connection between the foundation and the wooden frame above. This is typically done through a process called bolting the sill plate.
In older homes, the wooden sill platethe horizontal timber that sits directly on the foundationis often only nailed or inadequately anchored. During an earthquake, this connection can fail, causing the entire house to slide off its foundation. Retrofitting involves installing steel anchor bolts every 4 to 6 feet along the perimeter of the foundation. If existing bolts are missing or corroded, they must be replaced with high-strength, epoxy-set bolts that meet current California building codes.
For homes with a crawl space, adding plywood shear panels to the cripple walls (the short vertical walls between the foundation and the floor frame) is essential. These panels act like structural walls, transferring lateral forces from the house to the foundation. Use structural-grade plywood (at least 3/8 inch thick) and secure it with 8d common nails spaced 6 inches on the edges and 12 inches in the field. Always follow the California Existing Building Code (CEBC) Chapter 13 for retrofit specifications.
Pro tip: If your home has a garage attached to the main structure, pay special attention to the soft story condition. The large open door opening on the first floor creates a structural weakness. Retrofitting may require installing steel frames or reinforced concrete walls to support the weight of the upper floors.
3. Secure Heavy Furniture and Appliances
While structural retrofits protect the shell of your home, securing contents protects lives. During an earthquake, unsecured furniture, water heaters, and appliances become deadly projectiles. In San Jose, over 50% of earthquake-related injuries occur due to falling objects, not structural collapse.
Start with the water heater. It must be strapped with two metal strapsone at the top and one at the bottomanchored to wall studs with lag screws. This prevents the tank from toppling, rupturing gas or water lines, and causing fire or flooding. The California Plumbing Code requires this for all water heaters installed after 1988, but many older homes still lack this basic safety measure.
Secure bookshelves, cabinets, and entertainment centers to wall studs using flexible straps or L-brackets. Use museum putty or non-slip pads under heavy items like TVs, stereos, and glassware. Avoid placing heavy objects on high shelves. Install childproof latches on cabinet doors to prevent contents from spilling out.
Refrigerators and washing machines should also be anchored. Use flexible gas connectors for stoves and ensure gas lines are equipped with automatic shutoff valves. These valves detect sudden pressure drops (like those caused by a ruptured line) and cut off gas flow automatically, reducing fire risk.
4. Reinforce Chimneys and Masonry Elements
Chimneys, especially those made of unreinforced masonry, are among the most dangerous elements during an earthquake. Their rigid structure doesnt flex with seismic movement, making them prone to toppling. In San Jose, many older homes feature brick or stone chimneys that extend above the rooflinethese are high-risk features.
If your chimney is cracked, leaning, or shows signs of separation from the house, it must be repaired or removed. The safest long-term solution is to replace it with a lightweight, steel-framed chimney or to cap it and seal it off entirely. If removal is not feasible, reinforce the chimney with steel straps anchored to the roof structure and the foundation.
Similarly, inspect any exterior masonry walls, retaining walls, or decorative stonework. These elements should be tied into the main structure with metal anchors. Loose or crumbling masonry should be professionally repaired using epoxy injection and re-pointing with flexible mortar.
5. Upgrade Windows and Glass Surfaces
Large windows and glass doors are vulnerable to shattering during seismic shaking. Flying glass is a leading cause of injury in earthquakes. In San Jose, where modern homes often feature expansive glazing, this risk is amplified.
Install safety film on all large windows and sliding glass doors. This transparent, adhesive polyester film holds shattered glass together, preventing dangerous shards from scattering. For maximum protection, use laminated glass or tempered glass when replacing windows. These materials are designed to break into small, dull pieces rather than sharp shards.
Also, consider replacing single-pane windows with double-pane units. Not only do they offer better insulation and energy efficiency, but the air gap between panes adds structural resilience. Ensure window frames are securely fastened to wall studs using appropriate fasteners.
6. Install an Automatic Gas Shut-Off Valve
One of the most life-saving upgrades you can make is installing an automatic gas shut-off valve. During an earthquake, gas lines can rupture, leading to leaks and potentially catastrophic fires. Even a small spark from a fallen appliance or electrical short can ignite a gas cloud.
Automatic shut-off valves detect ground motion above a preset threshold (usually 0.2g to 0.5g) and close the main gas line within seconds. These devices are now required by law in many California jurisdictions for new construction, but retrofitting is strongly encouraged for older homes.
Look for valves certified by the California Office of the State Fire Marshal (OSFM). Installation should be performed by a licensed plumber or gas fitter. Some utility providers in the Bay Area offer rebates for installing these systems. Check with Pacific Gas and Electric (PG&E) for current incentive programs in San Jose.
7. Prepare an Emergency Kit and Evacuation Plan
Earthquake-proofing isnt only about physical upgradesits also about preparedness. Create a comprehensive emergency kit and communicate an evacuation plan with all household members.
Your kit should include:
- Three gallons of water per person for at least three days
- Non-perishable food (high-calorie, no-cook options)
- Flashlights with extra batteries
- First aid supplies and essential medications
- Portable radio with NOAA weather alerts
- Multi-tool, duct tape, and plastic sheeting
- Important documents in a waterproof container (insurance policies, IDs, deeds)
- Emergency cash
- Comfort items for children and pets
Designate two meeting points: one right outside your home and another outside your neighborhood. Practice earthquake drills monthlydrop, cover, and hold on. Teach children to never run outside during shaking. Identify safe spots in each room: under sturdy furniture, away from windows and hanging objects.
Best Practices
Follow Local Building Codes and Regulations
San Jose adheres to the California Building Code (CBC) and the California Existing Building Code (CEBC), both of which have stringent seismic provisions. When undertaking any retrofit or renovation, always obtain the necessary permits. Unpermitted work may void your insurance coverage and create issues during future home sales.
Permits ensure that work is inspected by city engineers and meets minimum safety standards. The City of San Joses Department of Planning and Development offers free online resources and checklists for homeowners. Use their Homeowners Guide to Earthquake Retrofitting to navigate the permitting process.
Use Certified Professionals
Seismic retrofitting is not a DIY project for most homeowners. While simple tasks like strapping a water heater can be done by a homeowner, structural modifications require expertise. Hire contractors who are licensed by the California Contractors State License Board (CSLB) and specialize in seismic retrofitting.
Look for contractors with experience in San Joses specific soil conditionsmany areas in the city sit on loose, liquefiable soils that amplify ground shaking. Ask for references, proof of insurance, and a written warranty on all work performed.
Consider Insurance and Financial Incentives
Standard homeowners insurance does not cover earthquake damage. You must purchase a separate earthquake insurance policy. In San Jose, policies are available through the California Earthquake Authority (CEA), a publicly managed but privately funded organization.
CEA offers discounts for homes that have undergone seismic retrofits. For example, bolting and bracing your home can reduce your premium by up to 25%. Some policies also offer loss of use coverage, which pays for temporary housing if your home becomes uninhabitable.
Additionally, the City of San Jose and the State of California offer financial assistance programs. The Earthquake Brace + Bolt (EBB) program provides grants of up to $3,000 to qualifying homeowners for retrofitting. The Homeowners Assistance Program (HAP) offers low-interest loans for seismic upgrades. Visit the official San Jose government website to check eligibility.
Plan for Long-Term Resilience
Earthquake-proofing is not a one-time task. Re-evaluate your homes safety every 510 years. As materials age, bolts can corrode, wood can rot, and connections can loosen. Schedule periodic inspections, especially after any significant tremoreven minor ones.
Consider upgrading to modern building materials when replacing roofs, siding, or flooring. Fiber-cement siding, steel framing, and reinforced concrete foundations offer superior seismic performance. Even small upgrades, like replacing brittle plaster walls with flexible drywall, can improve resilience.
Engage Your Community
Seismic safety is a neighborhood issue. Organize or join a Community Emergency Response Team (CERT) in your area. San Jose has active CERT chapters in neighborhoods like North San Jose, East San Jose, and Cambrian Park. These groups train residents in basic search and rescue, first aid, and damage assessment.
When entire blocks retrofit together, the collective resilience increases. Shared resources, bulk discounts on materials, and coordinated inspections make the process more affordable and efficient. Talk to your neighbors. Share information. Build a network of preparedness.
Tools and Resources
Essential Tools for Homeowners
For basic retrofitting tasks, keep these tools on hand:
- Drill with masonry and wood bits
- Impact driver or hammer drill
- Level and measuring tape
- Stud finder
- Socket set and wrenches
- Heavy-duty construction adhesive
- Steel anchor bolts (1/2 inch diameter, 610 inches long)
- Structural plywood (3/8 inch or thicker)
- 8d or 10d galvanized nails
- Seismic safety film for windows
- Flexible gas connectors
- Automatic gas shut-off valve (CEA-certified)
Online Resources
Use these trusted, up-to-date resources for guidance:
- California Earthquake Authority (CEA) www.earthquakeauthority.com: Information on insurance, retrofitting incentives, and educational materials.
- City of San Jose Earthquake Safety Program www.sanjoseca.gov/earthquake: Free checklists, permit applications, and local contractor referrals.
- Earthquake Brace + Bolt (EBB) www.earthquakebracebolt.com: Grant application portal and DIY instructional videos.
- USGS ShakeOut www.shakeout.org: Download the annual Great California ShakeOut drill guide and participate in the October statewide earthquake drill.
- Stanford Universitys Earthquake Engineering Research Center https://ee.stanford.edu: Research papers and case studies on Bay Area seismic risks.
- PG&E Earthquake Safety www.pge.com/earthquakesafety: Information on gas line safety and automatic shut-off valve rebates.
Professional Services in San Jose
Reputable seismic retrofitting contractors in the area include:
- Bay Area Seismic Retrofitting, Inc.
- San Jose Structural Solutions
- Golden State Seismic
- Bayshore Engineering & Construction
Always verify licenses through the CSLB website (www.cslb.ca.gov) and read reviews on platforms like Yelp and Angi. Avoid contractors who demand full payment upfront or refuse to provide written contracts.
Real Examples
Case Study 1: The 1952 Ranch in Willow Glen
A homeowner in Willow Glen purchased a 1952 single-story ranch with a crawl space and an unbraced cripple wall. The home had no foundation bolts, and the water heater was unstrapped. After a minor 3.8-magnitude tremor in 2020, the homeowner noticed a slight tilt in the front porch and a cracked foundation seam.
She contacted the City of San Joses Earthquake Safety Program and qualified for a $2,800 EBB grant. With professional help, she completed the following retrofits:
- Installed 18 new 1/2-inch anchor bolts along the foundation
- Added plywood shear panels to all four cripple walls
- Strapped the water heater and installed a gas shut-off valve
- Applied safety film to all windows
Cost: $7,200 total (after grant). The home passed a post-retrofit inspection and received a seismic safety certificate. Within a year, the homeowner received a 20% discount on her earthquake insurance.
Case Study 2: The 1970s Split-Level in Cambrian Park
A family in Cambrian Park lived in a 1970s split-level with a detached garage and a soft-story condition. The garages open front wall supported the second floor above. During the 2019 Bay Area tremors, the garage door frame cracked, and the upstairs floor creaked ominously.
They hired a structural engineer who recommended installing a steel moment frame in the garage to replace the open wall. The project cost $18,000, but they qualified for a $5,000 state grant and a 15% insurance discount. The retrofit was completed in six weeks. In 2023, during a 5.1-magnitude quake centered near Morgan Hill, the home experienced strong shaking but sustained no structural damage. The family credited the retrofit with saving their home.
Case Study 3: The 1930s Bungalow in North San Jose
An elderly couple in North San Jose lived in a 1930s bungalow with an unreinforced brick chimney and plaster walls. They were hesitant to spend money until a neighbors home suffered a chimney collapse during a 2021 tremor.
They opted for a phased approach: first, they capped and sealed the chimney ($1,500), then installed safety film on all windows ($800), and finally, strapped the water heater and installed a gas shut-off valve ($1,200). They used a low-interest loan from the Citys HAP program. Total cost: $3,500. They now feel secure and have shared their story at neighborhood meetings, inspiring three other families to retrofit.
FAQs
Is earthquake retrofitting required by law in San Jose?
No, retrofitting is not universally mandatory for single-family homes, but it is required for certain multi-family and commercial buildings under the Mandatory Retrofit Ordinance. However, many cities in the Bay Area, including San Jose, strongly encourage retrofitting and offer incentives. Failure to retrofit may result in higher insurance premiums and reduced property value.
How much does it cost to earthquake-proof a home in San Jose?
Costs vary based on home size, age, and condition. Basic retrofits (bolting and bracing) for a typical 1,500 sq. ft. home range from $3,000 to $7,000. Adding a gas shut-off valve, water heater straps, and window film adds $1,000$2,000. Soft-story retrofits can cost $15,000$30,000. Grants and insurance discounts can offset up to 40% of the total cost.
Can I do earthquake retrofitting myself?
You can perform some tasks yourself, like strapping the water heater, applying safety film, and securing furniture. However, structural worksuch as bolting the foundation or installing shear wallsrequires professional expertise and permits. Improper installation can worsen structural integrity and void insurance claims.
Will earthquake retrofitting increase my homes value?
Yes. Homes with documented seismic retrofits are more attractive to buyers, especially in high-risk areas like San Jose. A retrofit can increase resale value by 510% and make your home easier to insure and finance. Buyers are increasingly aware of seismic risks and prioritize safety.
How often should I inspect my home for earthquake damage?
Inspect your home annually for new cracks, sticking doors, or uneven floors. After any earthquake of magnitude 4.0 or higher, conduct a thorough inspection of your foundation, chimney, and utility connections. Consider a professional inspection every five years.
Does earthquake insurance cover retrofitting costs?
No, earthquake insurance covers damage after an event, not preventive upgrades. However, many policies offer premium discounts for retrofitted homes. Some insurers may also cover temporary relocation costs if your home becomes unsafe after a quake.
Whats the difference between a soft story and a cripple wall?
A cripple wall is a short wooden wall (usually 1836 inches tall) between the foundation and the first floor in homes with crawl spaces. A soft story refers to a floor with large open areas, like garages or retail spaces, that lack sufficient walls to resist lateral forces. Both are structural weaknesses, but they occur in different parts of the building.
Can I retrofit a condo or apartment in San Jose?
Yes, but its more complex. In condos, structural retrofits are typically managed by the homeowners association (HOA). Individual unit owners can secure appliances, install safety film, and prepare emergency kits. Check with your HOA for building-wide seismic upgrade plans.
Conclusion
Living in San Jose means embracing innovation, diversity, and opportunitybut it also means acknowledging the powerful forces of nature beneath our feet. Earthquakes are not a question of if, but when. The difference between a home that survives and one that becomes a hazard lies in preparation. Earthquake-proofing your home is not an expense; its an investment in safety, peace of mind, and long-term financial security.
This guide has walked you through the critical steps: from assessing your homes vulnerabilities to securing heavy objects, reinforcing your foundation, installing automatic shut-off valves, and engaging with community resources. Youve seen real examples of how ordinary homeowners in San Jose have transformed their homes into safer havens. You now have access to the tools, professionals, and financial incentives that make this journey achievable.
Dont wait for the next tremor to be your wake-up call. Start today. Take one stepinspect your water heater, call your city for a free assessment, or apply for a retrofit grant. Your familys safety, your homes future, and your communitys resilience depend on the actions you take now. In a city built on the edge of the earths fault lines, preparedness isnt optional. Its the foundation of a thriving life.